Crafting Cozy: How to Make & Sell Blanket Ladders with a Vintage Charm
Hey there, fellow DIY enthusiasts and vintage lovers! Ever dreamt of adding a touch of whimsy and practicality to your home decor? Well, buckle up, because today we're diving into the wonderful world of blanket ladders! They're not just for styling, they're also a charming and efficient way to organize your throw blankets and add a touch of vintage charm to any space. So, grab your tools, gather your inspiration, and let's get crafting!
The Alluring Appeal of Blanket Ladders
Think about it: a beautifully crafted ladder, adorned with cozy blankets, adds a touch of rustic elegance to any room. It's a functional work of art that speaks of warmth, comfort, and timeless style. Blanket ladders have become a popular decor trend, and for good reason! They offer:
- Visual Appeal: A blanket ladder instantly elevates your space with its unique aesthetic. It adds texture and depth, becoming a focal point in any room.
- Organization: No more tangled blankets strewn across furniture! A ladder provides a designated and stylish spot to store your throws, making your living space feel tidier and more inviting.
- Versatility: Blanket ladders are not just for blankets! You can also use them to showcase towels, scarves, quilts, or even decorative items.
- Personalized Touch: With various wood types, finishes, and styling options, you can personalize your ladder to complement your existing decor.
The Essential Tools & Materials
Before we get our hands dirty, let's gather the essential tools and materials for creating your very own blanket ladder. You'll need:
- Wooden Dowels: These form the rungs of your ladder. Choose a diameter that suits your aesthetic and the weight of your blankets. You'll typically need four to six dowels for a standard-sized ladder.
- Wooden Boards: These will serve as the ladder's sides, so choose a sturdy wood type like pine, oak, or cedar. You'll need two boards, the length of which depends on your desired ladder height.
- Wood Glue: A strong wood glue is essential for securely attaching the dowels to the boards.
- Wood Screws: These provide extra strength and stability for the construction.
- Drill: You'll need a drill with a screwdriver attachment to pilot holes and secure the screws.
- Saw: A saw will be needed to cut the wooden boards to the desired length.
- Sandpaper: Smooth out any rough edges and prepare the wood for finishing.
- Wood Stain or Paint: Choose a finish that complements your existing decor and personal style. You can go for a natural wood look, a vintage-inspired wash, or a bold color.
- Finishing Supplies: Depending on your chosen finish, you might need brushes, rags, and sealant.
Crafting Your Blanket Ladder: A Step-by-Step Guide
Now for the exciting part: building your very own blanket ladder! Here's a detailed guide to help you through the process:
1. Cut the Boards
Start by cutting your wooden boards to your desired length. Remember, the height of the boards will determine the height of your blanket ladder. Measure twice, cut once!
2. Mark the Dowel Placement
Decide on the spacing between your rungs. A good rule of thumb is to space them about 8-12 inches apart. Mark the placement of the dowels on both boards using a pencil.
3. Drill Pilot Holes
Use your drill to create pilot holes at each marked spot on the boards. These pilot holes will prevent the wood from splitting when you screw in the dowels.
4. Secure the Dowels
Apply a generous amount of wood glue to each dowel, making sure it's evenly distributed. Insert the dowels into the pilot holes, ensuring they are flush with the board surfaces.
5. Reinforce with Screws
Use your drill to secure the dowels with screws. Drive the screws through the boards and into the dowels, ensuring they are firmly attached.
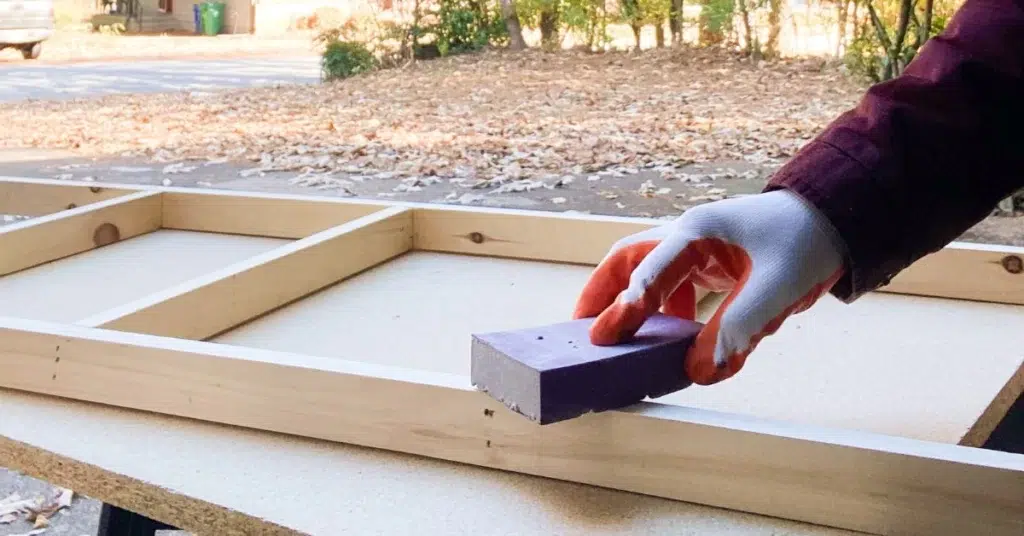
6. Sanding and Finishing
Once the ladder is assembled, use sandpaper to smooth out any rough edges and create a smooth surface. Then, apply your chosen finish, whether it's wood stain, paint, or a combination of both.
7. Let it Dry
Allow the finish to dry completely according to the manufacturer's instructions. Once dry, your ladder is ready to be styled!
Adding a Vintage Flair
To give your blanket ladder a unique vintage touch, try incorporating these elements:
- Distressed Wood: Create a weathered look by sanding down the edges of the wood and applying a light wash of paint or stain.
- Rustic Hardware: Use antique-looking screws, brackets, or hooks for added charm.
- Vintage Paint: Opt for a soft, muted paint color that evokes a vintage feel, like pale blues, creams, or greens.
- Upcycled Materials: Give old pieces of furniture, doors, or ladders a new life by turning them into a blanket ladder.
Styling Your Blanket Ladder: Creating a Cozy Haven
Now comes the fun part - styling your blanket ladder! Here are some tips to create a cozy and inviting look:
- Texture and Color Play: Mix and match blankets with different textures and colors to create visual interest. A chunky knit throw, a fluffy faux fur blanket, and a soft cotton quilt make a wonderful trio.
- Seasonal Styling: Adjust your blanket choices according to the season. Use warm, earthy tones and heavier fabrics in the winter, and opt for lighter, airy fabrics in the summer.
- Accessorize with Style: Enhance your ladder's charm with decorative elements. Hang baskets filled with plants, place a vintage book on the top rung, or drape a string of fairy lights for added ambiance.
- Placement is Key: Find a strategic location for your ladder, like a corner of your living room, beside a cozy armchair, or at the foot of your bed.
Turning Your Craft into a Business
Are you feeling inspired and ready to share your blanket ladder creations with the world? Turning your crafting passion into a business can be a fulfilling and rewarding experience. Here's how to get started:
1. Define Your Brand
What makes your blanket ladders special? What kind of aesthetic do you want to convey? Clearly defining your brand identity will help you stand out in the market.
2. Develop a Pricing Strategy
Consider your costs (materials, time, and overhead), and research what similar products are selling for. Set prices that are competitive and profitable.
3. Choose Your Sales Channels
Decide where you want to sell your creations. Options include online marketplaces (Etsy, Amazon Handmade), social media platforms (Instagram, Facebook), craft fairs, and local boutiques.
4. Create High-Quality Product Photos
Showcase your work with professional-looking photos that highlight the details and charm of your blanket ladders.
5. Provide Excellent Customer Service
Respond promptly to inquiries, package your products carefully, and provide a positive customer experience. Building strong relationships with your customers is key to success.
Embrace the Journey
Creating and selling blanket ladders is a rewarding journey that blends creativity, practicality, and a touch of vintage charm. From the initial crafting process to the joy of seeing your creations bring warmth and style to others' homes, every step is filled with satisfaction. So, unleash your inner artisan, get those tools ready, and let's create something beautiful!


No comments:
Post a Comment
Note: Only a member of this blog may post a comment.